Optimizing and constantly improving Google Ads campaigns often involves analyzing large amounts of data, a lot of time and lots of trial and error. However, we can use the “Experiments” option to test modifications to campaigns before fully implementing them. That way, we can easily measure the results and compare them, and then apply the changes that have proven to improve performance.
The Google Ads Experiments section basically allows you to create a custom experiment from your original campaign and then compare how your new experiment will perform against your original campaign. The experiment will share your original campaign’s traffic and budget, and will let you test changes to your campaign so that you can make better decisions on which strategy works better.
How Google Ads Experiments work
When you create an experiment, Google Ads creates a copy of the original campaign so you can make all the changes you want to it, and then test it live.
You can create and run experiments on your campaign to test the impact of any changes you think could have better results. If you split the budget equally (50% – 50%) between the original campaign and the experiment, you will be able to compare the results over a time period. If your experiment has a better performance at the end of that time period you chose, you will also be able to apply the experiment to the original campaign or replace the original campaign entirely.
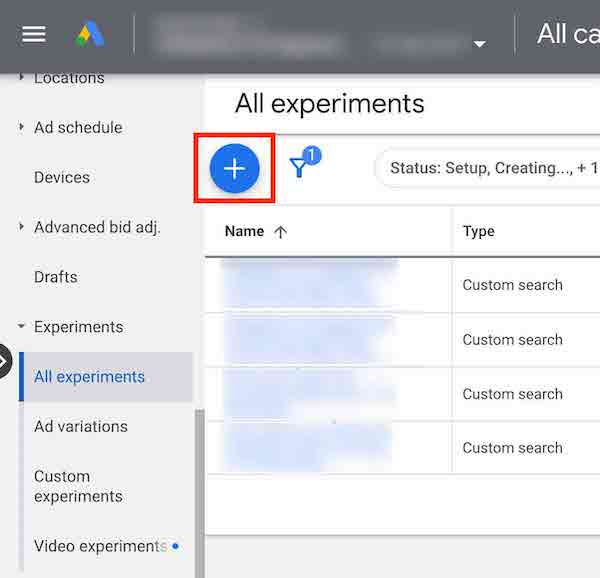
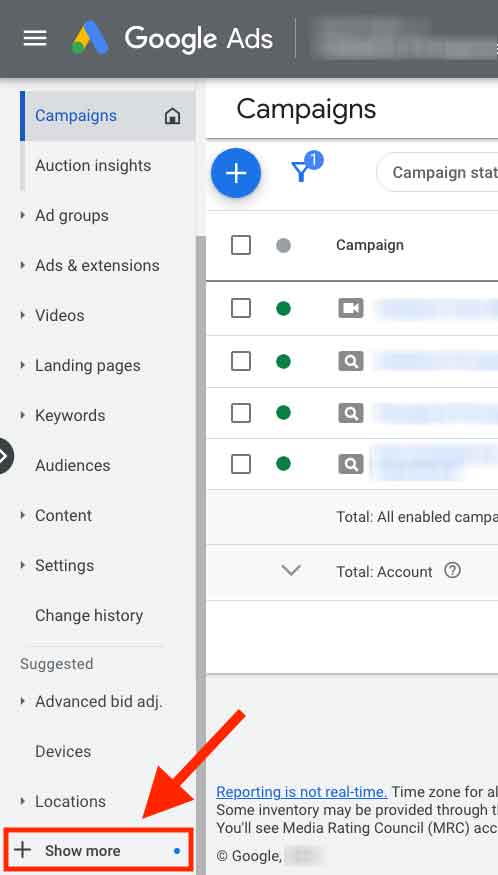
To set up the experiment, click “Experiments” in the left page menu. It is found under the “Show More” option.
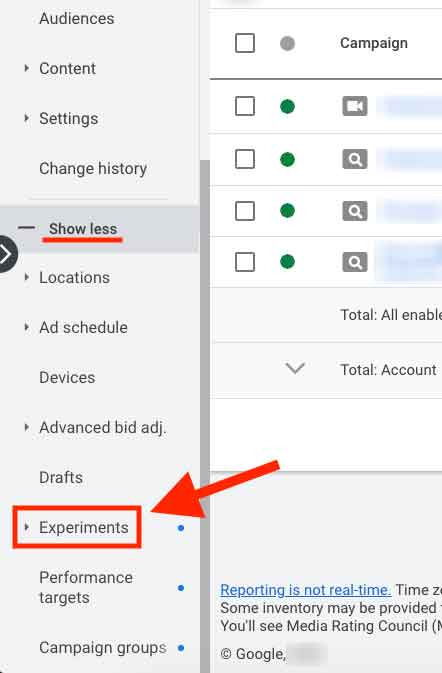
To view and manage all your experiments, click “All experiments“.
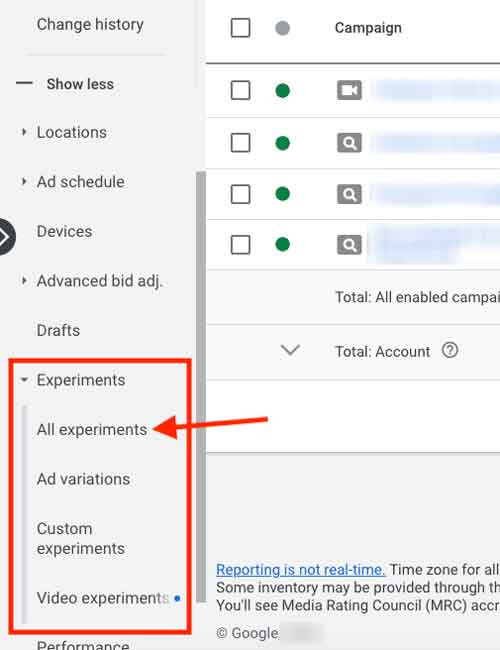
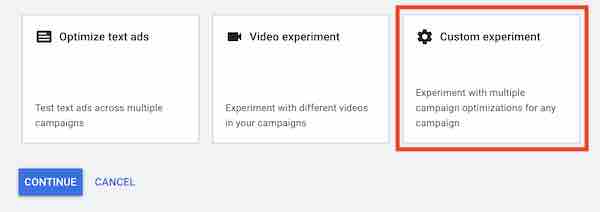
To create a new experiment, you will have to select a specific experiment type: ad variations, custom experiments, or video experiments.
Why you should use campaign experiments in Google Ads
Experiments allow you to test how the changes you make to the draft campaign will affect the original campaign – but always in a safe, semi-controlled environment.
As an example, let’s say you’ve created a new landing page for a campaign. You need to know if it performs better than your old landing page. To do that, you could – in theory – simply copy all the old ads and change the landing page (the destination URL) and compare the results over a period of a month or more. But this test would not provide accurate results because there are too many variables that could “pollute” your numbers.
An example of these variables would be doing this test in a month that is seasonally much more favorable than the others, and when traffic is higher and the audience’s likelihood to buy is a lot stronger.
Therefore, the perfect environment to test new versions of your old landing page is to simultaneously show ads that direct users to its new test version and to show ads that direct users to its current (old) version – in the same period, with symmetrically equal delivery time for both: 50% each (you can change that percentage if you want). That’s what Google Ads experiments do, while still keeping your account organized. It is also easy to compare the data at the end of your experiment.
Experiments allow you to test different types of changes to your campaign. Here are some of the most frequent:
- New keywords;
- An increase and/or a decrease in bids;
- New ads (new ad copies);
- New ad placements;
- Test different bidding strategies;
- Test a different ad schedule;
- Test new landing pages.
Benefits of using campaign experiments in Google Ads
Experiments allow you to test changes to your campaigns easily and with the safety margin of using a method designed just for that. It has big advantages.
You can choose the duration of the experience
It is important to note that you should choose a duration that allows you to have enough data (volume of impressions, clicks, conversions, etc.) to be sure (and not in doubt) when making the final comparison. In general, I would say that less than two weeks is usually too short to get a good sample, but that really depends on how much data (traffic and conversions) your campaign gets in one day.
You can end an experiment whenever you want
You can end an experiment before the end date in case there are changes to your marketing strategy, your budget or your business as a whole.
You can control the budget allocated to the experience
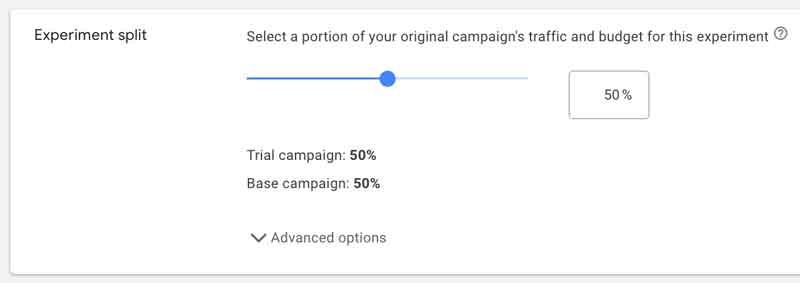
The “Experiment Split” section allows you to choose the amount of budget that will be allocated to the experiment. If you feel that the changes you’ve made may pose a high risk to the campaign, use only 10% or 20% for the experiment and monitor your performance very closely, on a daily basis.
How to set up a custom experiment in Google Ads
- From the page menu on the left, click “Experiments“, then click “All experiments” (if you don’t see the “Experiments” option in the page menu, click “Show More” at the bottom of the menu to expand all the options, as I explained above with screenshots).

- Click the “Plus” button right above the “All Experiments” table and choose “Custom experiment“.

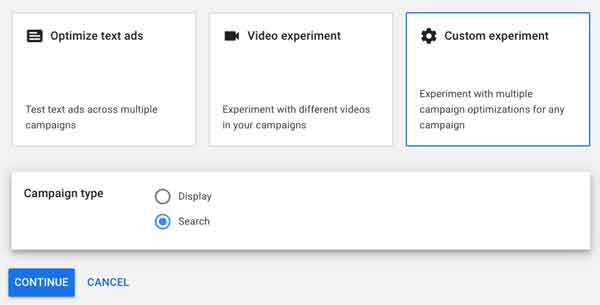
- Click “Custom experiment (experiment with multiple campaign optimizations for any campaign)” then hit “Continue“.

- Choose the campaign type.

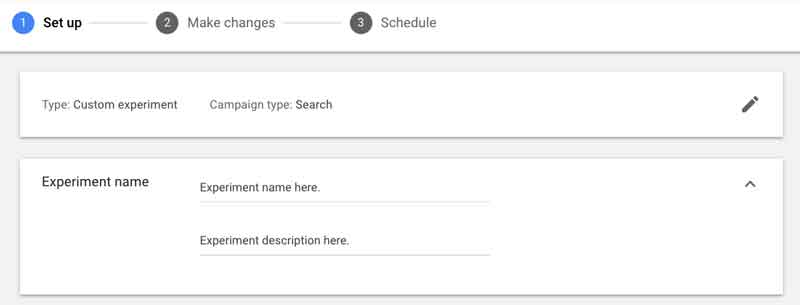
- In the “Set up” section, name your experiment and write a description. Your experiment can’t have the same name as your campaigns and other experiments.

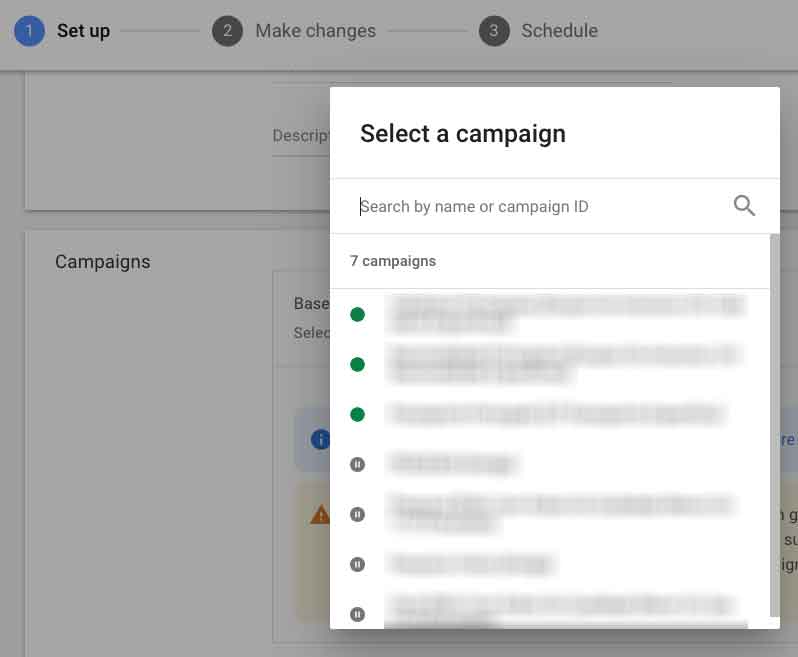
- Select the original campaigns you want to test in your experiment. Google Ads will show the campaigns you selected and create the experiments.

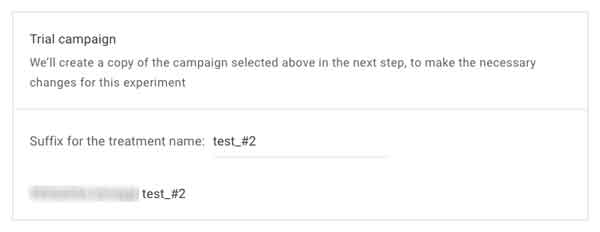
- It’s important to label your test campaigns with a suffix, so you will know which one is the original campaign and which one is your test campaign. Google Ads will append the suffix to all of your test campaigns.

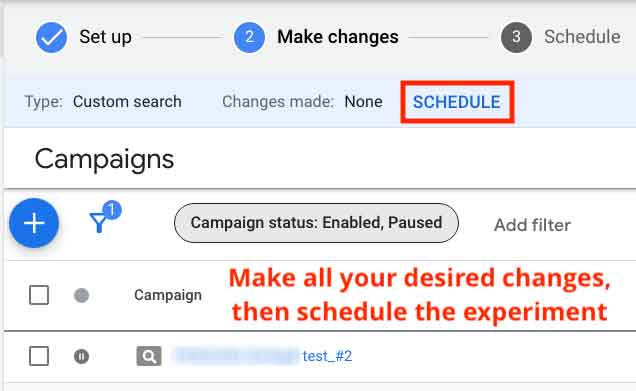
- Hit “Continue” to finish the setup. The next page will give you options to make changes and schedule your experiment.

- In the “Experiment goals” section, choose up to 2 goals to compare your success metrics. For example, select “Conversions” and “Increase” for the first goal.

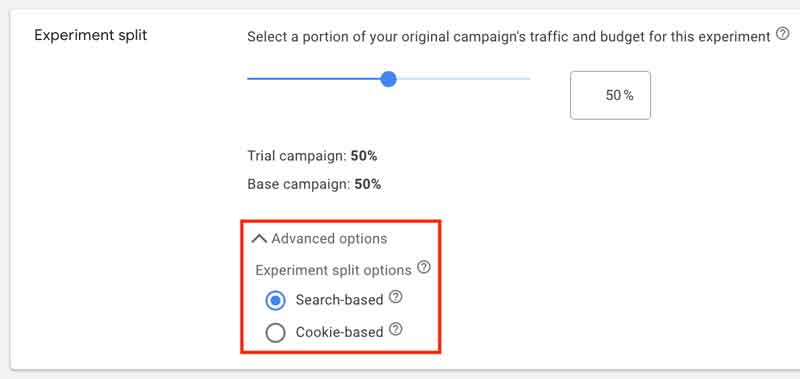
- In the “Experiment split” section, select the traffic and budget you want to allocate to your experiment. Using 50%-50% is usually the best choice, as it provides the most reliable comparison between the original campaign and the experiment.

- Select the “Advanced” settings you want to use in the experiment:
Cookie-based: randomly assigns users to either your experiment or original campaign. A given user will only see either the ads of the original campaign or the ads of the experiment.
Search-based: in this setting, if a user does multiple searches, that same user could see both – the ads of the experiment and of your original campaign. This option may get statistically significant results faster than the Cookie-based option.
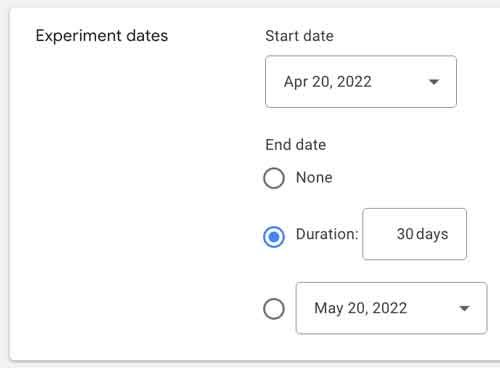
- In the “Experiment dates” section, select the start date and duration.

- In the “Enable Sync” section, choose whether you want all the changes made to your base campaign (while the experiment is running) to be automatically applied to the experiment or not.

- Click “Save“. Your experiment is now ready to run.
About Experiment Sync
Custom experiments allow you to test changes to your campaigns. Experiment Sync ensures that all the changes you make to your original campaign while your experiment is running will be copied (synced) to the experiment campaign.
How Experiment Sync works
Copying changes to experiments manually can be time-consuming and error-prone, especially if you are running many campaigns and experiments at the same time.
Once your trial starts at the scheduled time, experiment sync will:
- Automatically update the experiment with any changes made to the original campaign.
- List all changes in Change History.
Keep in mind that Experiment Sync only works when you make changes in one direction, i.e. from the original campaign to the experiment campaign. If you make changes in your experiment campaign first, they will simply be ignored.
Experiment Sync is available for Search and Display campaigns, and it is turned on by default when you create a new experiment. You can turn it off while creating the experiment, but you can’t change this setting after the experiment campaign has been created.
It can’t be turned on for trials that have been scheduled.
After you turn Experiment Sync on:
- It can take up to 10 minutes after the experiment has started to implement the changes.
- If you have more than one experiment scheduled to run (e.g. 3 experiments starting at different dates), experiment sync will update all experiments with the same updates to ensure that they are perfectly synced with the original campaign.
Important things you should know about Google Ads custom experiments
- Custom experiments are only available for Search, Display, and Video campaigns.
- Up to 5 experiments can be scheduled for a campaign, but only one experiment can run at a time.
- Depending on the size of your campaign, it may take some time for your experiment’s ads to be reviewed and start running. You can schedule your experiment to begin at a future date to prevent it from running before your ads have been completely reviewed.
- As I mentioned before, you can choose the percentage of your original campaign’s budget that you will allocate to your experiment.
- You can (and should) monitor your experiment’s performance as it runs.
- In Display campaign experiments, it is good practice to use cookie splits (cookie-based split, explained above in this article) to ensure that users only ever see the experiment or your original campaign.
Measuring the results of your experiment
It is essential to understand how the experiments affects your results. In campaign experiments, we can see results in two ways:
Experiment Summary
This section displays the metrics of the experiment in relation to the original campaign.
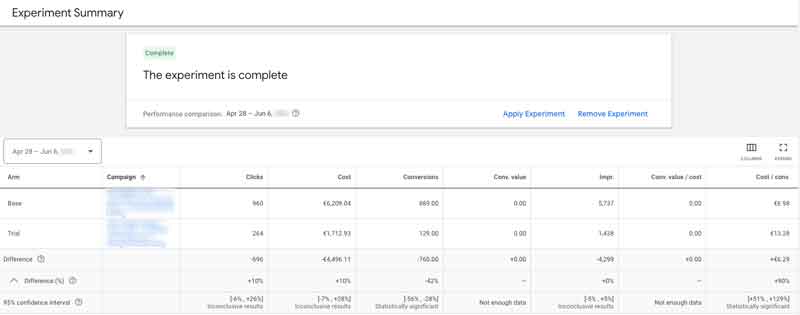
This view is great because it also tells you whether results can be considered statistically significant by saying “Statistically significant” right next to the metrics.
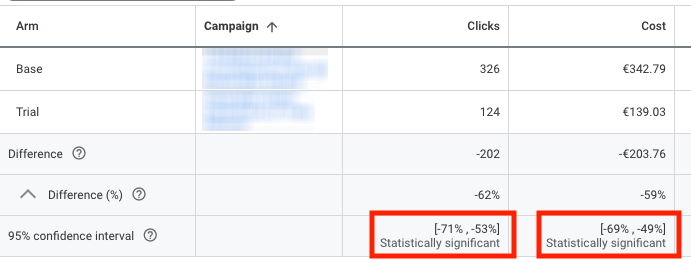
In the example above, there was a 59% decrease in cost and a 62% decrease in the number of clicks (see the “Difference (%)” row).
Measuring ad group and keyword performance individually
The “Experiment Summary” described above is useful for a higher-level comparison and for analyzing metrics more superficially. But there are cases in which you really need to review ad groups and keywords individually – within the experiment and within the original campaign – to compare them. I recommend placing windows side by side (base campaign on the left and experiment on the right) on your screen to do that.
It allows you to understand how the performance of ad groups and of individual keywords affected the overall results (the numbers in the “Experiment Summary” view). Monitoring ad group and keyword metrics will give you a view of your campaign experience at deeper, more detailed levels.
How to apply your experiment to the original campaign
If you’re satisfied with the results of the experiment, you can apply your changes to the original campaign. In the “Experiment Summary” view, click “Apply Experiment” above the metrics table.
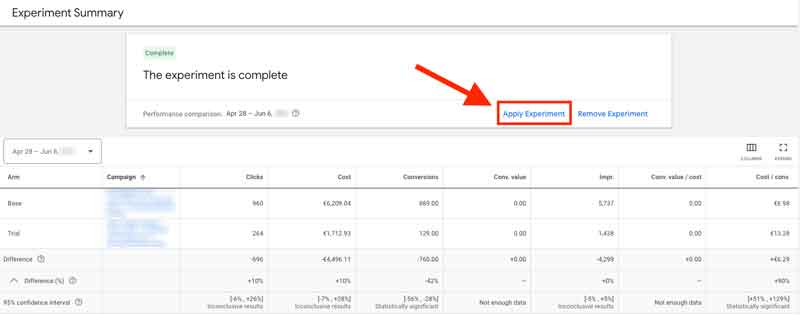
A pop-up window opens with two options:
- “Update your original campaign”: this option will overwrite the original campaign with the experience.
- “Convert to a new campaign”: this option will create a new campaign from the experience and the original campaign will remain active in parallel.
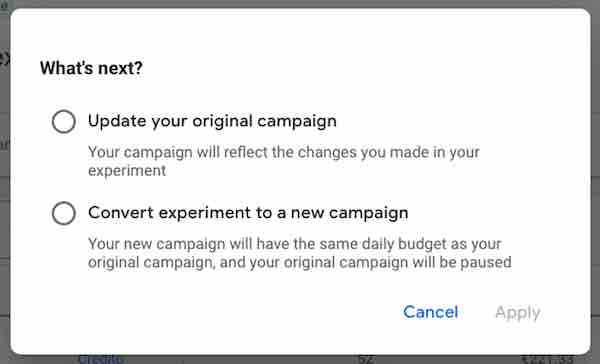
Choose the best option for you and click “Apply”.
Quality Score in campaign experiments
A very interesting aspect of experiments in Google Ads is that the Quality Score of the keywords in the original campaign is completely isolated from the Quality Score of the keywords in the experiment. Therefore, if the keywords in the experiment have their Quality Score changed, it will not affect the original campaign at all. That’s why experiments are also the best choice to test ways to improve your Quality Score. If you decide to apply it to the original campaign at the end of the experiment, the Quality Scores from the experiment will overwrite the ones in the original campaign.
Happy experimenting!

