Many of the tasks of managing a Google Ads account can be performed on a scheduled and automatic basis by pre-set rules. This can greatly increase the efficiency of campaign management and make the overall performance of your account more stable and secure.
In this article, we will learn how to use this feature: the automated rules in Google Ads.
Learning how to use them is essential because they are true “robotic arms” at your disposal, which can make account control easier in many ways.
What exactly are Google Ads automated rules?
Google Ads advertisers can set up rules that run automatically. They help a lot when you’re not in front of your computer or simply don’t have time to do the work manually. Automated rules allow you to make changes to your campaigns automatically, based on settings and conditions you choose. You can change your ads status, budgets, bids, and many other things.
For example, if you want to raise a keyword’s bid every time it moves off the top of the results page, you can create a rule for that.
Common ways to use automated rules: a few examples
By using automated rules, it is possible to:
- schedule your ads to run at specific times throughout the day;
- adjust keyword bids by time of day, seasonal factors (promotions, events, etc.) or based on other dynamic conditions;
- control your budget and spending by pausing campaigns based on pre-established conditions;
- automatically pause poorly performing keywords;
- automatically pause poorly performing ads;
- turn campaigns on and off according to specific criteria;
- receive emails when something happens to your account;
- receive emails as soon as any pre-set condition is met;
- receive an email when a campaign exceeds its daily spend limit;
- enable or pause special ads for promotional events;
- change bids for keywords based on their cost per conversion;
- increase budget for campaigns that convert more;
- many other possibilities!
Where to find automated rules in the Google Ads interface
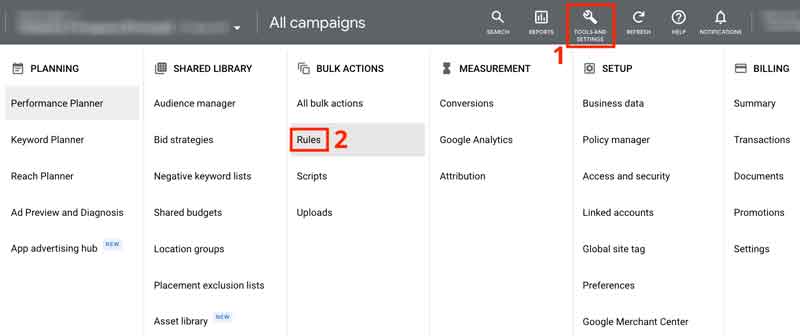
From the top menu, choose “Tools & Settings” (1), then under “Bulk Actions” click “Rules“.
Considerations before creating an automated rule
-
MCC account managers
If you are an MCC account manager (which houses multiple Google Ads accounts), log into one of the accounts and then create the rule. It is not possible to create rules at the MCC level.
-
Don’t forget to set up email notifications for changes the rules make
We all make mistakes, and it’s not uncommon for us to accidentally miss a step. Through notifications we can have more control over the actions that the rules triggered when activated.
-
Make adjustments as needed
If your campaigns have more basic automation needs, the default examples in the “Conditions” section (in the rule setup process) might suit you well. But if you need to create rules with more complex criteria, you should explore the possibilities of creating several simultaneous conditions.
How to create an automated rule
-
Go to the “Rules” section
As shown in the screenshot above, go to “Tools and Settings” in the top menu, and then go to “Rules”.
-
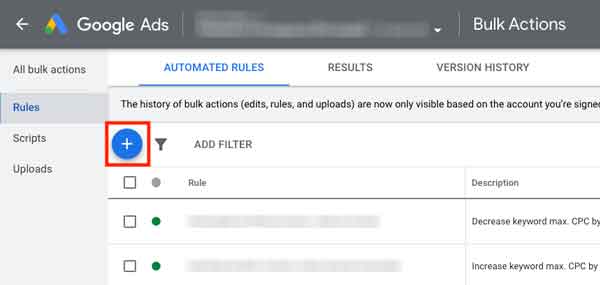
Click the blue “+” button

-
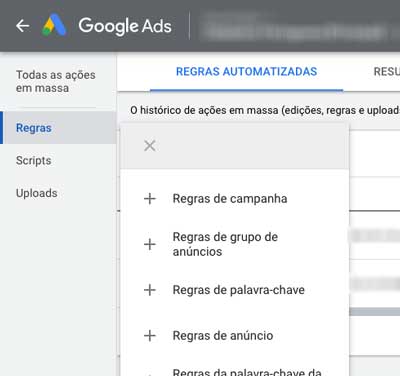
Choose the type of rule you need to create
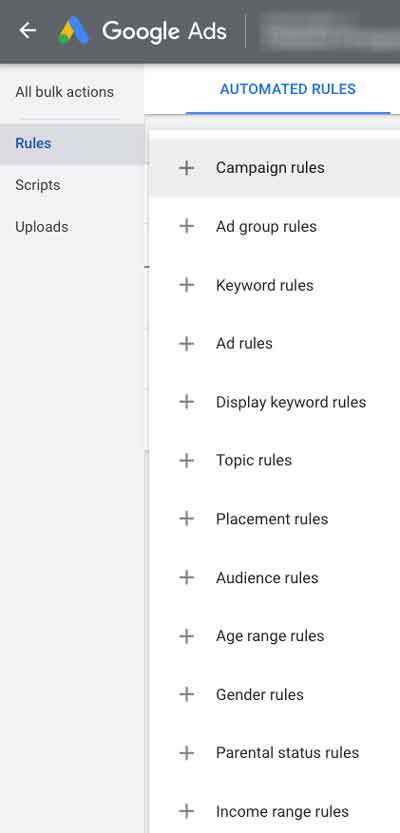
The automated rule types are:
-
- Campaign rules
- Ad group rules
- Keyword rules
- Ad rules
- Display keyword rules
- Topic rules
- Placement rules
- Audience rules
- Age range rules
- Gender rules
- Parental status rules
- Income range rules
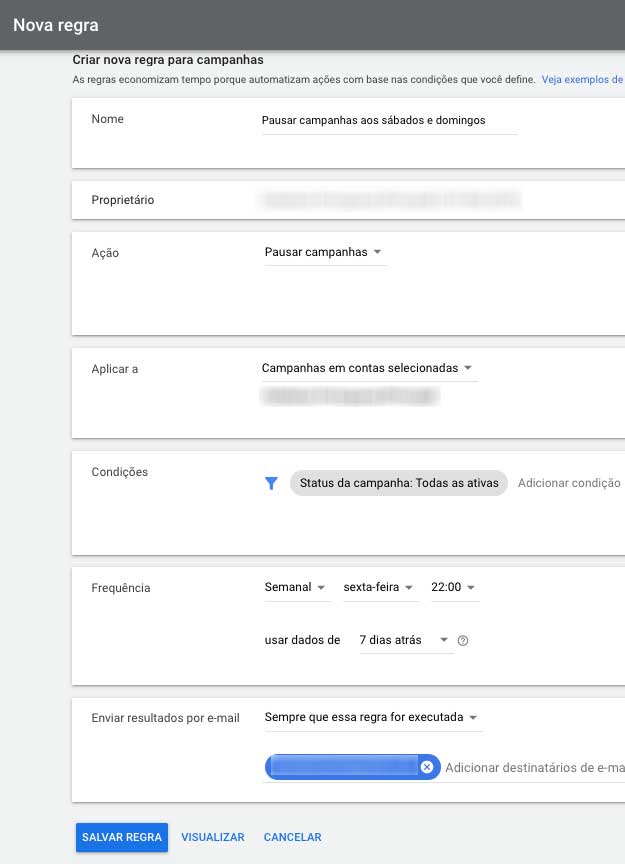
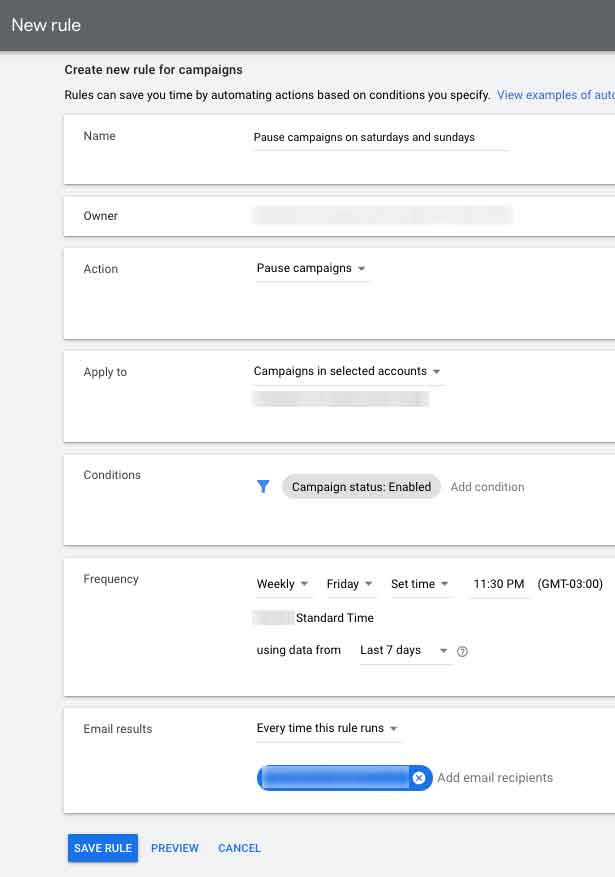
In this example, I will create a campaign rule: I want all active campaigns in my account to be paused on weekends (remember: this is just a specific example and does not mean that all campaigns that are turned off on the weekend have better performance).
-
-
Configure the new rule according to your needs
In this new example rule, my choices were: “ Pause campaigns ” in the “ Action ” field, “ Campaign status: All active ” in the “ Conditions ” field (you can add more conditions through the “ Add condition ” option), “ Weekly, Friday, 22:00 ” in the “ Frequency ” field and “ 7 days ago ” in the “ Use data from ” field (as the frequency of the rule is weekly, this option must be consistent with this period). And since I want to be notified whenever the rule takes action, I chose the option “ Whenever this rule is executed ” in the “Send results by email” field.
-
If necessary, create another rule to undo the first one
In the example above, I created an automated rule to pause all active campaigns on Fridays at 10 pm. Since my intention is to pause campaigns only on weekends (Saturdays and Sundays), I have to create another rule to activate paused campaigns on Sunday night or Monday morning.
Possibilities of criteria for creating automated rules
The “Conditions” section of the rule configuration screen allows you to use multiple conditions simultaneously, so just use the “Add condition” option.

The conditions are grouped by categories (such as “Performance”, “Conversions”, “Competitive Metrics” and others). Just click on the dropdown arrow next to each category to see the options.
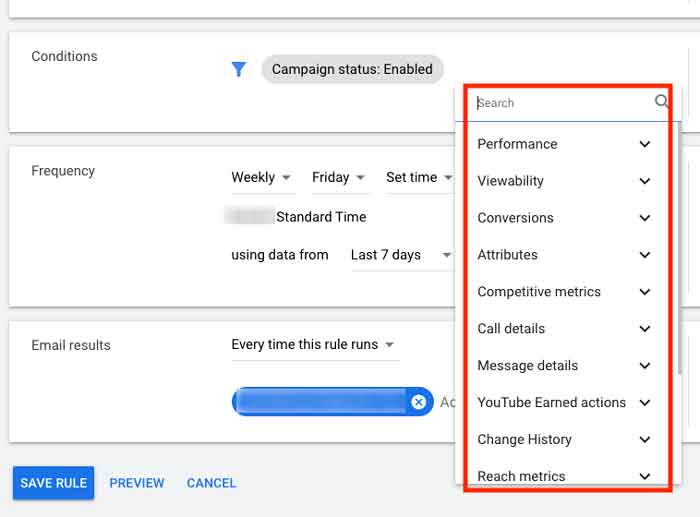
In addition to the “Campaign Status: All Active” condition, I added two more criteria to my rule as an example:
- affected campaigns will only be search campaigns (“Search”);
- affected campaigns will only be those that have received 100 clicks or more (“Clicks > 100”).
Example of automated rules with more conditions
For example, a rule could raise max CPC bids by 10% for keywords with more than 50 conversions and a cost per conversion under $15. Keep in mind that setting a maximum bid is always recommended.
A second rule could decrease bids by 10% for keywords with a cost per conversion more than $15.
As a practical example, you are now going to learn how to create these 2 rules. They will basically:
- rule 1: increase bids for keywords that are converting well and at a low cost per conversion;
- rule 2: decrease bids for keywords that aren’t.
How to create the rules:
Create rule 1
From the top menu, choose “Tools & Settings“, then under “Bulk Actions” click “Rules“.
Click the plus button to create a new rule.
From the rule type list, select “+ Keyword rules”.
- Name your rule “Cheap conversions keywords – increase bids by 15%” or anything similar you want.
- In the “Action” section select “Change keyword bids“.Under “Action” select “Increase bids“
- Next to “Increase by percentage”, enter “15%”.
- In the “Condition” section, click “Add Condition“, and under “Conversions” select “Cost / conv.”
Set Cost / conv. to “<$10” (you need to change “$10” to the amount you consider to be “a cheap conversion” for your business. - Click “Add Condition” again, now under “Conversions” select “Conversions“, and set to “>50”.
- Click “Save Rule” to create rule 1.
Create rule 2
Click the plus button to create a new rule.
From the rule type list, select “+ Keyword rules”.
- Name your rule “Expensive conversions keywords – decrease bids by 15%” or anything similar you want.
- In the “Action” section, select “Change keyword bids“.Under “Action” select “Decrease bids“
- Next to “Decrease by percentage”, enter “15%”.
- In the “Condition” section, click “Add Condition“, and under “Conversions” select “Cost / conv.”
Set Cost / conv. to “>$15” (you need to change “$15” to the amount you consider to be “an expensive conversion” for your business. - Click “Add Condition” again, now under “Conversions” select “Conversions“, and set it to “>50”.
- In the “Frequency” section, in the “using data from” field, choose “Last Week“.
- Click “Save Rule” to create rule 2.
Warning: be very careful with rules that increase or decrease bids!
Increase and decrease bid rules can both lead to serious errors very easily!
Here’s an example:
- let’s say you need to set up an automated rule that increases bids by 15% on weekends (Saturdays and Sundays);
- so you also need to set up another automated rule that undoes the one above by decreasing bids by 15% on Monday morning, so all bids should go back to what they were before the weekend.
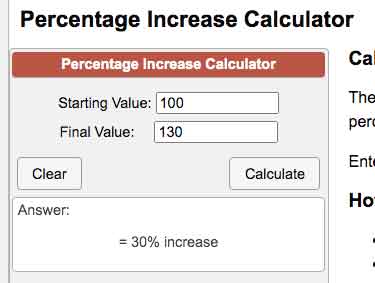
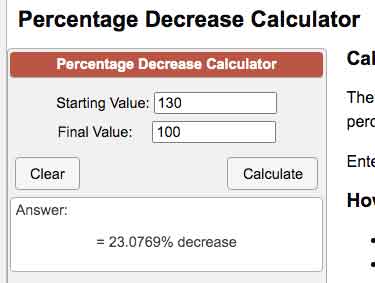
This means keywords with a US$ 1.00 bid will go up to US$ 1.15 when the first rule runs. But when the second rule runs, it will deduct 15% from US$ 1.15, which will lower your bid to US$ 0.97 – and not back to US$ 1.00, as it was before.
As you can see, 15% of US$ 1.15 (US$ 0.18) is more than 15% of US$ 1.00 (US$ 0.15). This means every second automated rule – be it a decrease or increase bid rule – has to be calculated and set up correctly. Otherwise, every time the second rule runs your bids will be either lower (if it is a decrease bid rule) or higher (if it is an increase bid rule).
If your rule is recurring (if it runs every day, week, month, etc.) it will make your bids go into a kind of mathematical spiral. As a result, your ads will either:
- show in a lower position every time the second rule runs – if it is a decrease bid type – until it disappears from search;
- show in a higher position every time the second rule runs – if it is an increase bid type – and you will eventually start paying way too much for every click.
Most unexperienced advertisers will make the mistake above. It has very serious consequences. In some cases, it can be a true disaster.
To avoid it, to create your second bid change rule you need to use either:
Tip
If your Google Ads campaigns advertise products or services that belong to sensitive sectors, such as financial services, healthcare and medicine, alcohol, politics and hundreds of others, you will most likely have a hard time trying to get your ads approved.
This means Google may disapprove all the ads in one or many of your ad groups. As a result, your ads won’t show at all, and the affected ad groups will have 0 (zero) impressions.
To avoid this problem, you can create an automated rule. Follow the steps below:
- create a new rule and select “+ Ad group rules“;
- name it “One Or More Ad Groups Have Stopped Showing Ads” or anything similar you like;
- in the “Action” section, select “Send email“;
- in the “Apply to” section, select “Ad groups in selected campaigns“;
- click “Please select campaigns” and select all your active campaigns;
- in the “Conditions” section, choose “Ad group status: Enabled“;
- still in the “Conditions” section, choose “Add condition“, under “Performance” select “Impr.“. Set Impr. to “< 1” and click “Apply“;
- in the “Frequency” section, select “Daily, 11:PM – 12:00PM“, using data from “Today“;
- in the “Email results” section, select “Only if there are changes or errors” and add your e-mail address;
- preview the rule to make sure it will work correctly;
- click “Save Rule“.
This rule will send you an email every time an ad group has 0 (zero) impressions, which means it is very likely that all the ads in that ad group have been disapproved – so you have time to react as soon as possible.
That is just one more example of how we can use automated rules cleverly to avoid problems. You can adapt it to your scenario to make it even better (e.g. by changing the conditions, etc.).
Make good use of automated rules according to your needs, and manage your Google Ads account more efficiently!

