Before you start using Facebook Ads (and other great tools), you should set up a Facebook Business Manager account (it’s free, no extra cost).
This guide will show you how to create and configure a Facebook Business Manager account so that you can use Facebook Ads to improve your digital marketing strategy.
In this tutorial you will learn (click to jump to section):
- Why you should create a Facebook Business Manager account
- Facebook Business Manager vs. Facebook Ads Manager: the difference
- How to create your Facebook Business Manager Account
- How to connect your pages and accounts to Business Manager
- Access to your Business Manager assets
- Set up billing in Business Manager
- How to verify your domain in Business Manager
“I already have a Facebook profile and an ad account, so why do I have to create a Business Manager?”
If you advertise on Facebook and you share access to your Pages and ad accounts with other people, it is strongly recommended that you create a Business Manager. It is the best and easiest way to manage your Pages, ad accounts, and everything else you need.
You can have full control over who is working on what and what everyone can see. Having a Business Manager also allows you to keep your business separate from your personal Facebook profile.
What is the difference between Facebook Business Manager and Facebook Ads Manager?
Ads Manager is where you create your campaigns (your ads) and your audiences.
Business Manager is a true control center. You can think of it as a big umbrella. It is above Ads Manager. Pretty much everything you have on Facebook will be attached to it.
From Business Manager you will be able to control every aspect of your Facebook assets: see users who can access your ad account, manage your pixels, set up payment, and much more.
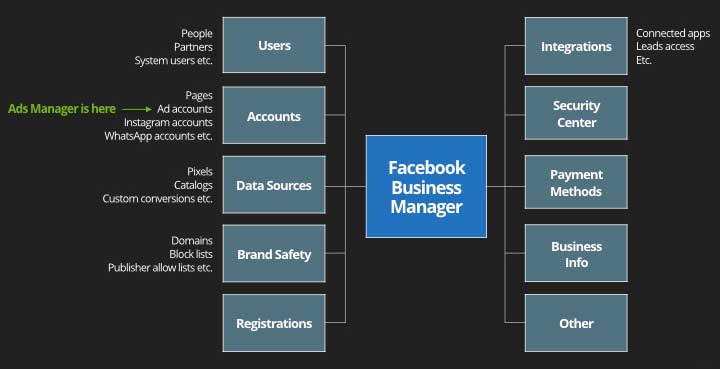
Your Business Manager is literally the headquarters of all your Facebook tools. Every business must have a Business Manager account (with their Ads Manager attached) if they want to manage everything easily.
It’s quite simple to set it up. Let’s see how.
How to create your Facebook Business Manager Account
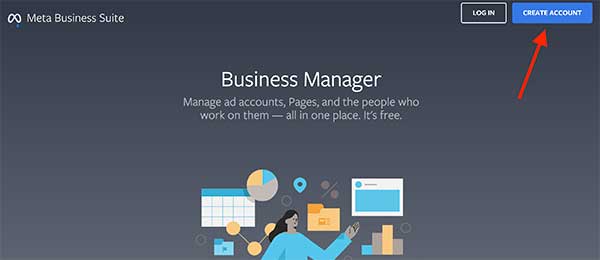
Go to business.facebook.com and click the “Create Account” button. You’ll have to sign in to your Facebook account if you haven’t done so already.
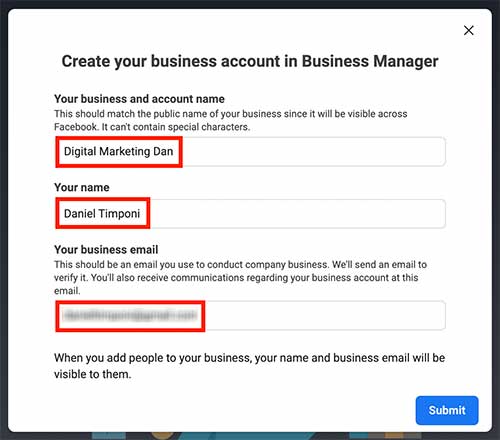
When you get the “Create your business account in Business Manager” popup, give your business a name. For the purpose of this tutorial, I’ll name it “Digital Marketing Dan”. Then, add your name and email address and click “Submit”.
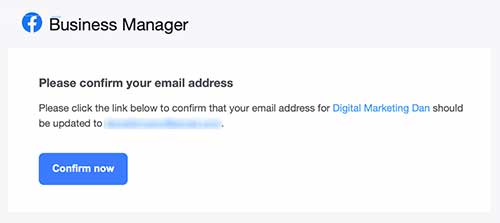
Now Facebook needs to verify your email address. Go to your inbox, find the verification email, open it and click “Confirm Now”.
That’s it! You have just created your Facebook Business Manager account.
But don’t go away yet, there’s more to do. We still need to connect any existing Pages and accounts to your new Business Manager.
Connecting your Pages and accounts to Business Manager
The main benefit of having a Business Manager account is being able to control all your Facebook assets from one single dashboard.
You can add your Facebook Page (or Pages), Instagram account, WhatsApp accounts, and also apps to your Business Manager.
Add your Pages to Business Manager
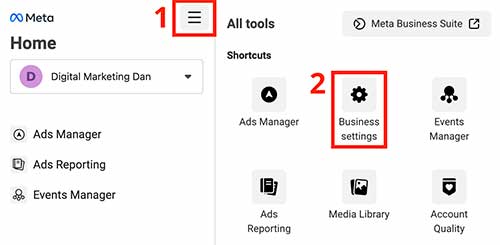
To add your Facebook Pages and Instagram accounts to your new Business Manager, click the hamburger menu at the top left (1), then select “Business Settings” (2).
From the left menu, under “Accounts”, go to “Pages” then click “Add” (2).
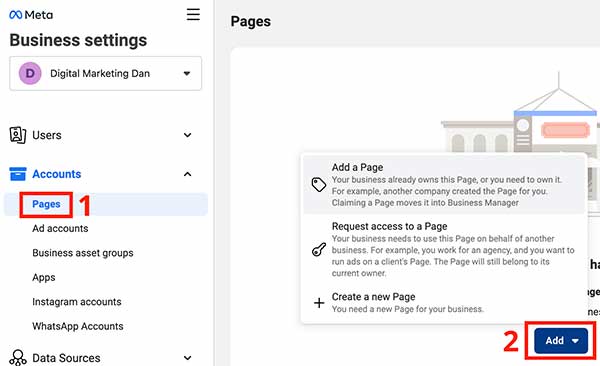
You will be prompted with 3 options:
- Add a page
- Request access to a Page
- Create a new Page
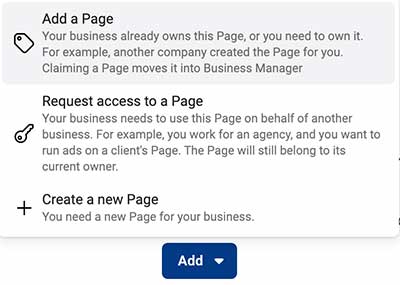
If you already own the Facebook Page you want to add to this Business Manager, choose “Add a page”.
Important
You can only add a Page if no other Business Manager has claimed this Page until the present.
The option “Request access to a Page” is usually for agencies or digital marketing freelancers who need access to their client’s Facebook Page, Ad Manager Account, etc.
“Create a new Page” is suited for businesses that haven’t created a Facebook Page yet. Because everybody needs to have a Page to run ads on Facebook, you should create your Page if you still don’t have one.
Add your Ads Manager (ad account) to your Business Manager
To connect your Facebook Ads Manager to your new Business Manager, go to “Ad accounts” on the left (1), then click “Add” (2).
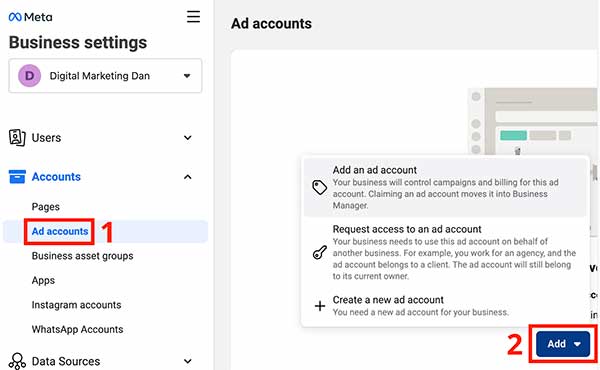
You’ll be prompted with 3 options:
- Add an ad account
- Request access to an ad account
- Create a new ad account
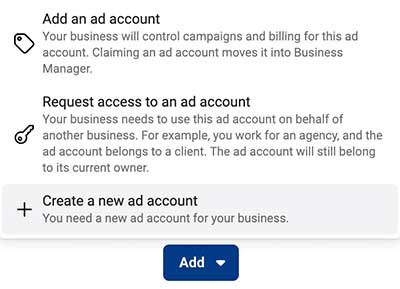
If you don’t have an Ad Account, create one by choosing “Create a new ad account” and just follow the steps.
If you are a digital marketing freelancer, an agency or a company with multiple existing ad accounts, you might have to choose “Request access to an ad account”.
For the purpose of this tutorial, I’ll take for granted you already have an Ads Manager (an ad account). So I’ll choose “Add an account”.
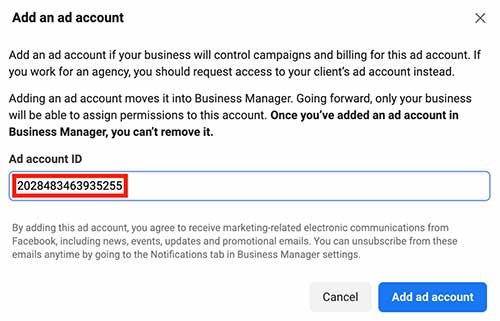
Now, in the “Add an account” popup that shows up, you have to enter your Ad account ID (this step is the same as when you request account access from another person).
Where to find your ad account ID
The easiest way to find it is to open your Ads Manager account and look for the sequence of numbers after “campaigns?act=” in the URL (in the browser’s address bar). It can also be found in the top left-hand corner, right after your account name.
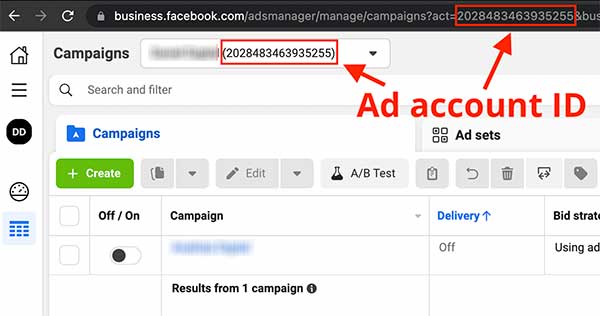
Copy the ID number and paste it into the “Ad account ID” field.
Access to your Business Manager assets
Important
After you have created your Business Manager account and added assets (Pages, ad accounts, etc.) to it, you still have to add yourself (your personal account) as a user to have access to them.
This may seem weird, but that’s because Business Manager “owns” the assets from now on, not you.
Your personal account and your Business Manager are two completely separate things. Therefore, if you don’t add yourself as a user to its assets, you won’t be able to edit them.
To add yourself to an ad account, go to your Business Manager, click “Ad accounts” on the sidebar menu (1), then click your Facebook Ads account (2) (you may have more than one) and choose “Add People”.
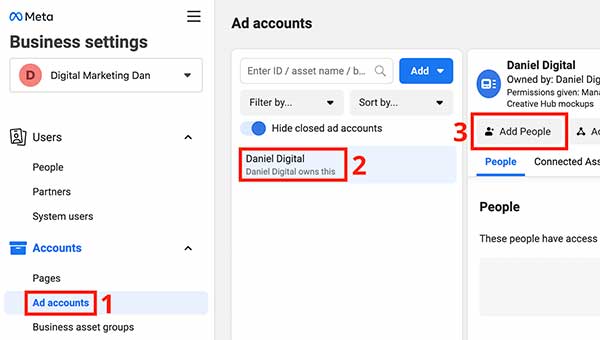
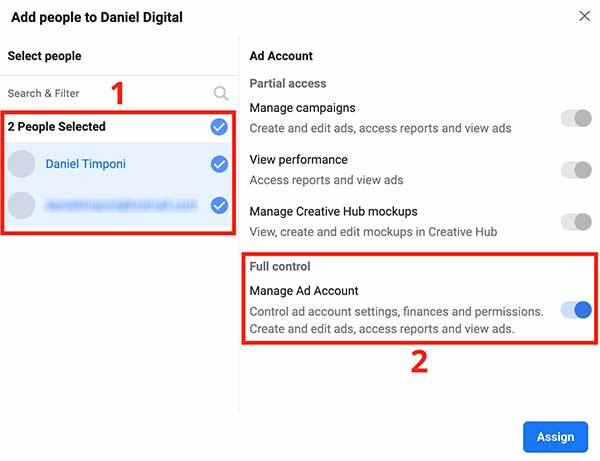
You will now be able to add users to your ad account and set their permissions. Choose your name (and any other people who need the same permissions as you) (1) and turn on the slider under “Full Control – Manage Ad Account” (2).
Remember
Every time you connect an asset (such as an ad account) to your Business Manager, you’ll have to add yourself (and all your teammates who need access) as a user to that asset.
Being able to add users and set their permissions is one of the greatest benefits of Business Manager. You can choose different permission levels according to the user’s needs.
For example, if a consultant needs to audit your account, you can give him “View Performance” access, which is a type of read-only access.
So for new users, the first step is always to add them as a user to Business Manager, and the second step is to add them (give them access) to the specific asset they will work on (Facebook Pages, ad accounts, pixels, etc.).
Set up billing in Business Manager
Before you add your payment methods in the “Payment Methods” section of Business Manager, you need to go to “Business Info” (1) first to enter your Business Details (2):
- Legal name of the business
- Address
- Business phone
- Website
- Tax ID
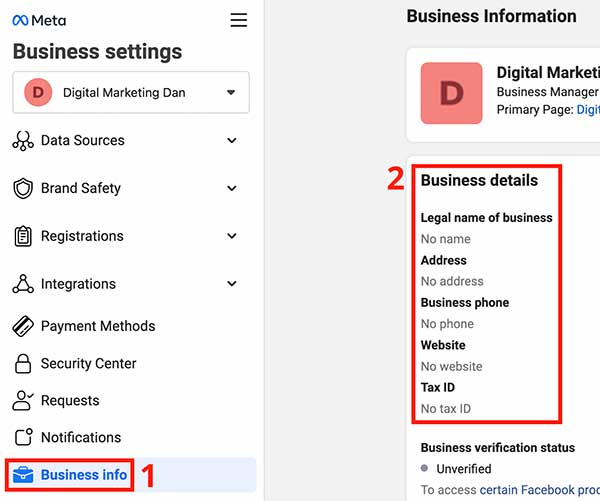
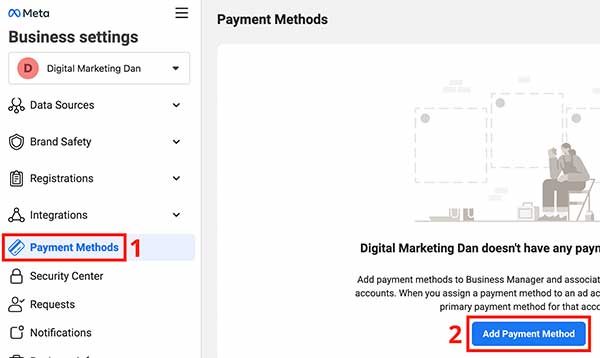
Now that you have completed all the business details, click “Payment Methods” on the menu (1) then choose “Add Payment Method” (2).
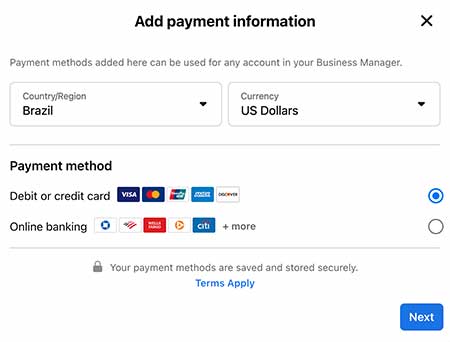
Enter your credit or debit card details. All your transactions related to Business Manager assets (ad accounts, etc.) will be paid with this card.
How to verify your domain in Business Manager
The last step for a successful Business Manager setup is verifying your domain. Facebook requires you to do this because it is the best way to prove you actually own your website.
To get your domain verified, click “Brand Safety” (1) on the menu, select “Domains” (2), then click “Add” (3).
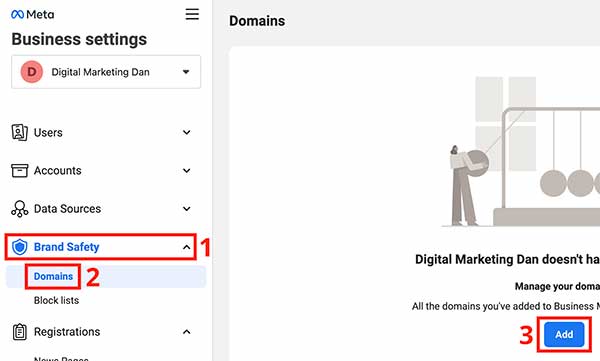
Enter your website domain then click “Add”. Reload the page to see your domain added.
Now, the verification. You’ll have to choose one of the three different methods to verify your domain:
- Meta-tag Verification
- HTML File Upload
- DNS Verification
Personally, I prefer the Meta-tag Verification because I think it is easier and faster.
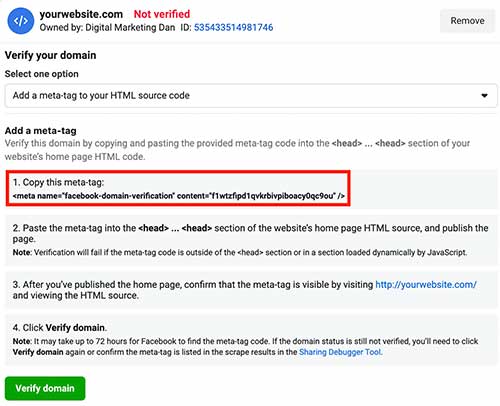
The meta-tag is a simple code snippet that you have to copy from Business Manager and add to the backend of your website (it won’t be visible on the frontend).
Then, Facebook will visit your website, detect the meta-tag and learn you own it – that’s the verification itself.
If your website is running on WordPress, you can use a free plugin such as Insert Headers And Footers to easily paste your meta-tag code and get it done.
If your website is not WordPress, then simply go to your platform’s documentation and do a search for “insert code” or “insert tags” to learn how to do it. It isn’t difficult.
Just don’t forget the meta-tag has to be pasted into the <head>…<head> section of your website’s home page HTML source.
After you’ve inserted the meta-tag, go back to Business Manager and click the “Verify domain” button. If Facebook fails to verify it immediately, just try again after a few hours.
The takeaway
Now you know how important it is to have your Facebook Business Manager up and running. It centralizes – and organizes – all your Facebook-related Pages, ad accounts, accounts, users, and more. That will make your management a lot easier.
Business Manager is equally suitable for companies, agencies, and freelance marketers – i.e. anyone who needs to manage either their own accounts or their client’s accounts from one single dashboard.
Now it’s time to start advertising!
Did you run into any problems while setting up your Business Manager account? If so, get in touch!
