Index
Despite being available in Google Ads since July 2013 (at that time Google Ads was still called Google AdWords), the Remarketing Lists For Search Ads – also known as RLSA – still remain underused these days by most advertisers.
In this post, you will learn how to use this strategy and we will also look at interesting ideas on how to implement it.
What are Remarketing Lists for Google Ads Search Ads (known as RLSA)?
Remarketing Lists For Search Ads is a Google Ads feature that allows an advertiser to show their text ads to an audience that has visited their website (or app) before. There are even more options to refine the criteria, such as being able to choose only people who have visited specific pages on your site.
So, with this feature, you can customize your search ad campaign for users who have already seen your business before.
For example, you can set up ad groups that will only show ads if the user (1) is on your remarketing list and (2) is doing a search with any of the keywords that are in your campaign (both conditions 1 and 2 have to be met).
You can also make bid adjustments by setting different maximum CPC bid amounts from those normally used, but this time targeted only at people who have visited your website or made a purchase from your online store before.
Advantages of RLSA
By using Remarketing Lists For Search Ads, you can refine your search campaigns to show ads to more qualified users who are already familiar with your site. When used wisely, RLSA campaigns can provide you with more efficient spending, higher conversion rates, and a better ROI.
This can significantly improve your sales.
What is the difference between RLSA and traditional Google Ads display remarketing?
The name “Remarketing Lists For Search Ads” is often confusing to many people. That’s because it appears to be the same thing as traditional display remarketing, but in its Search Network version. But it isn’t.
Traditional remarketing shows ads to users when they are browsing a website that is part of the Google Display Network. RLSA, however, does not show text ads to people just because they are on your remarketing list: users must also be actively searching on Google by using keywords that are in your campaign.
Tags and RLSA campaigns
Tags are small paragraphs of code that we insert on our websites to track visitor behavior. We can then see this data as reports (charts, tables, etc.), which is crucial for making strategic decisions. Tags are not visible on the website’s front end. They are just hidden in the code structure, which does not appear to visitors.

Remarketing lists for search ads are created from these tags. When people visit your site, they join a list of other past visitors. The tag does that job. Once we have a visitors list, we can choose to show text ads only to the people on that list.
Basic steps to create a Remarketing List For Search Ads campaign:
- Add the Google Ads tag or the Google Analytics GA4 tag to your website. You can create your RLSA campaigns by using either one of these two tags (we will see the procedure for both in this tutorial);
- Create a remarketing list (also called “Segment”);
- Add (assign) the remarketing list to a campaign or ad group.
Method 1: How to create an RLSA campaign using the Google Analytics GA4 tag
In general, most sites should already have the Google Analytics tag (it is usually installed during the development stage). It tracks visitor behavior and provides valuable reports to the website owner. Google Analytics is a free service (with the option of advanced paid plans) that is available to everyone. That’s why it is common practice to include this tag on the site when it is being built.
If you don’t know if your website has the Google Analytics tag, just use this extension for Google Chrome (or search for a similar extension for your browser) to check.
If your site still doesn’t have the Google Analytics tag, see how to insert it in this article (in most cases, you should skip to the paragraph that says “Set up data collection (for websites)“).
Once the tag is installed on your site, simply follow the steps below to enable data collection and the creation of remarketing lists.
-
-
-
-
Connect your Google Ads account to your Google Analytics GA4 account
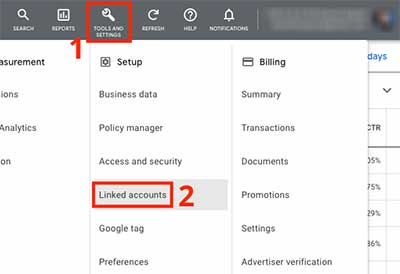
In order to run an RLSA campaign using the Google Analytics GA4 tag, first you need to connect your Google Ads account to your Google Analytics account. To do so, go to “Tools and Settings” (tool icon) on the top menu (1), then choose “Linked Accounts” (2).
 In the “Linked Accounts” section, click “Details” in the “Google Analytics (GA4) & Firebase” block.
If your Google Ads account is already linked to your Google Analytics account, you will see the account name (in the “Analytics property” column) in this section with the status “Linked”, and with the “Unlink” option in the “Actions” column. In this case, just leave it as it is.
If the accounts are not linked, you’ll see the “Not linked” status and the “Link” option. Click “Link” and follow the next steps.
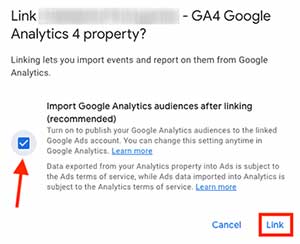
 When the confirmation window appears, make sure you check the box that says “Import Google Analytics audiences after linking (recommended)“, then click “Link“.
-
Log in to Google Analytics
Sign in to your Google Analytics account by clicking here.
-
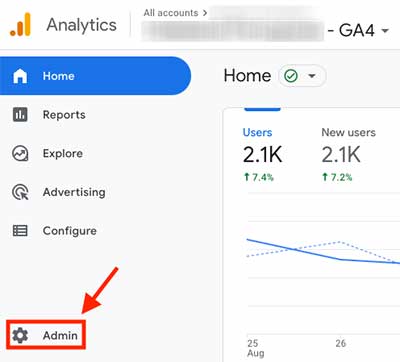
Go to “Admin” on the left menu at the bottom

-
In the middle column (“Property”), click “Data Settings”, choose “Data Collection”, then turn on the “Google signals data collection” switch.

Note: if you don’t see the switch, you will see a “Get started” button instead. Just click it and follow the steps.
-
Allow up to 48 hours for the lists to be available in Google Ads.
-
Go to the paragraph “How to create remarketing audiences (segments) and add them to campaigns in Google Ads” further down this post to finish setting up your RLSA campaign
-
-
-
Method 2: How to create an RLSA campaign using the Google Ads tag
-
-
-
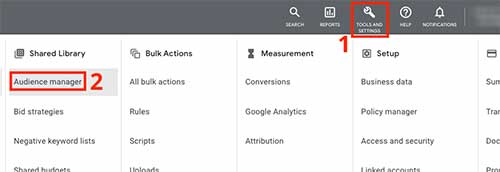
From the top menu, go to “Tools and Settings” (1) and then go to “Audience Manager” (2)

-
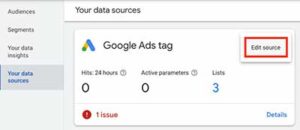
From the left menu, go to “Your data sources” (1), and then, in the “Google Ads Tag” box, click the dotted menu and select “Edit source” (2)

-
Set up the Google Ads tag
Note: depending on your account settings, you might see a “Configure tag” button to start the tag creation process. Just follow the steps on the screen.
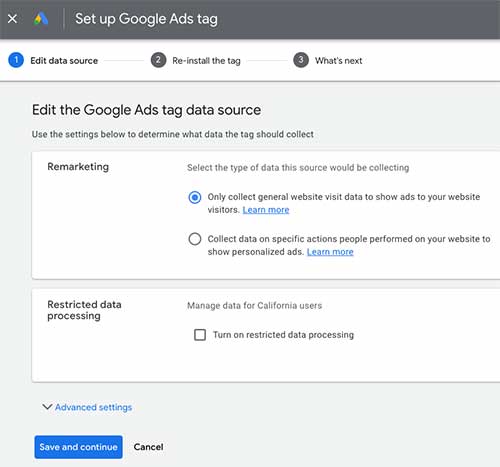
Step 1: Edit data source
In the “Remarketing” box, check the option “Only collect general website visit data to show ads to your website visitors”.
If you want to create dynamic remarketing campaigns, select “Collect data on specific actions people performed on your website to show personalized ads”.
If you need to run ads in California, you might have to check the option “Manage data for California users – Turn on restricted data processing”.

Click “Save and continue“.
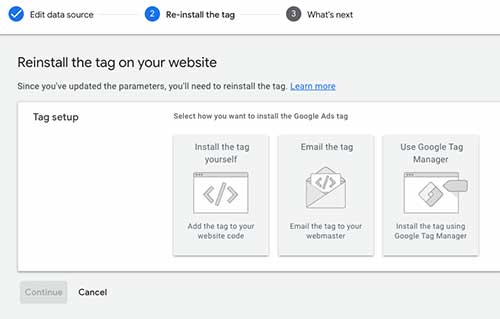
Step 2: Install or re-install the Google Ads tag on your website

You will have 3 installation options:
- Install the tag yourself;
- Email the tag to your trusted programmer (or “webmaster”) to install;
- Use Google Tag Manager.
Your choice here depends on your profile.
If you are the type of website and/or business owner who has technical experience, you will probably know how to install the tag yourself (method 1).
If you are the owner of the website and/or the business but do not have enough technical experience to install the tag, then choose method 2.
If you already use Google Tag Manager you probably know what to do!
Once you chose the installation method, just click it and follow the instructions (which are self-explanatory and very clear).
-
Check tag installation
After choosing the tag installation method and following the next steps, click “Done”.
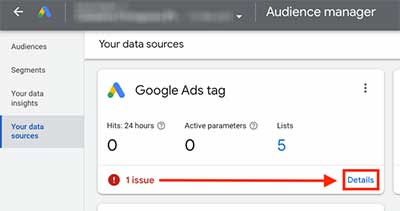
To make sure the tag was installed correctly and that the remarketing audience list creation is working, go to the “Your data sources” section again and check if there are any warnings in the “Google Ads Tag” box. In case you see issues, click on “Details” and follow the instructions to fix them.
 It is always convenient to visit this section from time to time, just to make sure there are no problems with the audience(s) created by the Google Ads tag and also with the audiences that come from other tags, such as Google Analytics GA4, if there are any.
 - Read the paragraph “How to create remarketing audiences (segments) and add them to campaigns in Google Ads” below to finish your RLSA campaign setup.
-
-
How to create remarketing audiences (segments) and add them to campaigns in Google Ads
No matter which tag you use – the Google Analytics tag or the Google Ads tag (or both simultaneously) – proceed with the steps below so that you can configure your RLSA campaign.
-
- From the top menu, go to “Tools and Settings” (1) then go to “Audience Manager” (2).

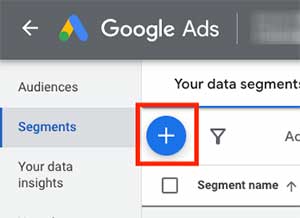
- Click the “+” button to add a target audience.

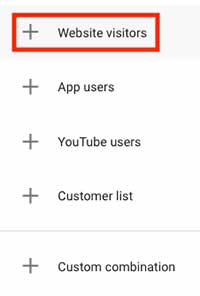
- Choose “Website Visitors” from the box that opens.

Keep in mind
I’m choosing “Website visitors” just for the purpose of this tutorial. Depending on your setup and objectives, you will need to choose “App users”, “YouTube users”, “Customer list” or “Custom combination” to create your remarketing list.
-
Configure the segment (target audience)
Segment name
In “Segment name”, give your audience a name that is easily intelligible, for your own reference.
Segment members
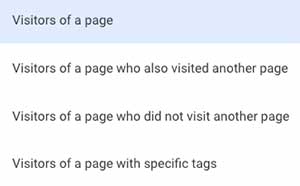
In the “Segment members” field you can choose the criterion for creating your target audience:
-
- Visitors of a page on your website;
- Visitors of one page who also visited another page;
- Visitors of a page who have not visited another page;
- Visitors of a page with specific tags.

For the purpose of this tutorial, I will choose “Visitors of a page” because the idea here is to create a basic remarketing campaign, which will show ads to people who have already visited any page on my site. But you can refine the criteria for creating your new target audience by using any of the other options. To learn more about them, read this article.Visited page
In the “Visited page” field you can choose among several criteria. I’ll choose a very basic one here: people who have visited any page on my site (digitalmarketingdan.com). So here’s the setup:
-
- “Match any group of rules”;
- “Page URL”, then I’ll choose “contains”;
- I’ll include my website: digitalmarketingdan.com .

Ideas for more targeted and customized segments
I am using basic settings here in this post. But you can use criteria that can be much more interesting for your business. Here are some examples:
-
- People who have visited the post-purchase “thank you” page on your online store (such as “your-site.com/thank you/”);
- People who have visited the “thank you” page after subscribing to your newsletter;
- People who clicked on the phone link or WhatsApp link on your website (and therefore have already contacted you or intended to);
- People who viewed your e-book download page – and therefore downloaded it;
- People who have visited specific product pages on your online store;
- People who have accessed a number of pages and posts on your website/blog. For example: people who visited 5 pages/posts (specific or not) on your site;
- People who have visited specific posts on your blog;
- People who have visited posts from specific categories on your blog (such as “your-site.com/blog/travel/”);
- People who came from (other) specific sites. An example: people who came from your YouTube channel.
Anyway, to get one of the above results just use the right combination of criteria. Here are some of the options you have:
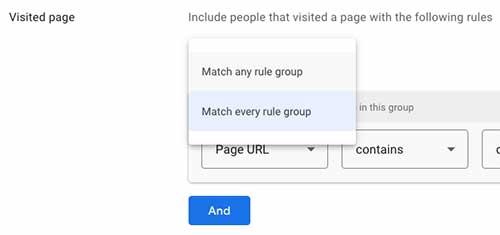
“Match any rule group” or “Match every rule group”:

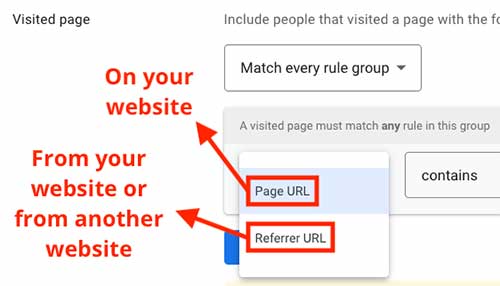
You can use combinations of rules by choosing “Match every rule group” “Page URL” and “Referrer URL”:

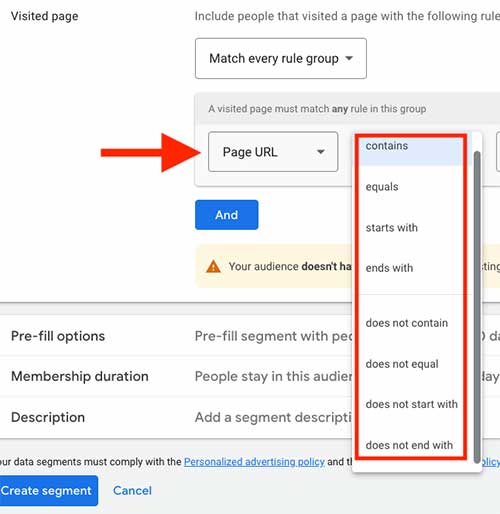
“Page URL” is used for URLs within your website, and “Referring URL” is used for URLs from other websites (from which visitors come to your site) Many page URL filter options:

There are many options for URL filters Pre-fill options
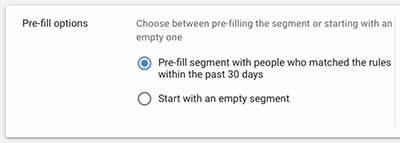
Leave the option “Pre-fill segment with people who matched the rules within the past 30 days” checked. This will include visitors who accessed your site in the last 30 days in your new segment (which is basically a list, don’t forget that). That is, Google Ads can “retroact” and add these visitors from the past.
 If you choose the second option “Start with an empty segment”, you will probably have to wait longer until your audience reaches the minimum number of 1,000 (one thousand) visitors in the last 30 days to be used in campaigns.
Membership duration
This field tells you how long a user will remain in your segment (in your list) after visiting your site. Personally, I see no reason to choose a period shorter than the maximum allowed (540 days), with rare exceptions. Therefore, enter “540”.

Description
In this field, you can enter a detailed description of the new segment for your own reference. Including information such as the date and context in which it was created can be very useful in case you need to know its history in the future.
-
-
Click “Create segment”
When you click the “Create segment” button and finish, you will be taken back to the Audience Manager section. You will see the status of your new audience segment, which will probably still be “Populating” (in the “Size: Search” column).

-
Add your audience segment to an ad group or campaign
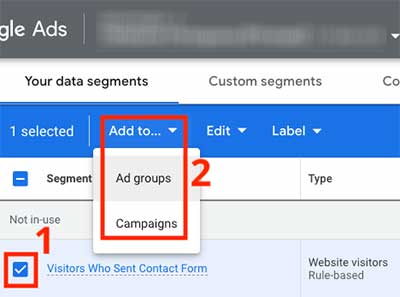
Once you’ve installed the tag of your choice (Google Analytics tag or Google Ads tag, or both) on your website and you’ve created your target audience segment – and the list reaches 1,000 visitors – all you have to do now is just add it to ad groups or campaigns. To do so, go to Audience Manager. Check the audience you want to add (1), then click “Add to” and choose either “Ad groups” or “Campaigns” (2).

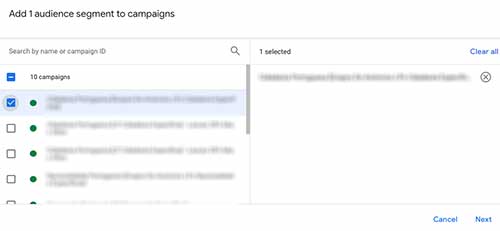
Select the ad groups or campaigns you want to add the audience segment to and click “Next”.
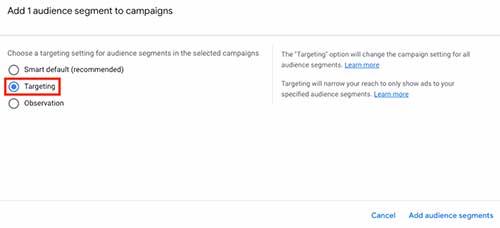
The last screen may raise doubts, but for RLSA campaigns (our objective here in this tutorial) choose the “Targeting” option and then click “Add audience segments”. If you want to read more about the difference between Targeting and Observation, visit this article.

- From the top menu, go to “Tools and Settings” (1) then go to “Audience Manager” (2).
That’s it! Your remarketing campaign for search ads has been created.
Ads from these campaigns or ad groups will only be shown to the audience segment you’ve added. In this example, they will be shown to people who have visited any page on my website in the past.
Tip: organize your remarketing lists by using more columns
In Audience Manager, you can add more columns to have better control over your audience segments. By default, the only columns displayed are:
- Segment name;
- Type;
- Membership status;
- Size: Search;
- Size: YouTube;
- Size: Display;
- Size: Gmail campaign.
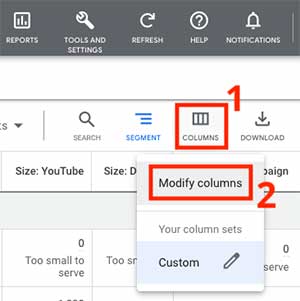
 One of the columns that does not appear by default is the “Source” column, which tells us the source of the target audience: whether it comes from the Google Ads tag or the Google Analytics tag. To add it, click on “Columns” (1) in the upper right corner, then choose “Modify columns” (2).
Check the box next to “Source” and click “Apply”. You can (and should) also add other columns and even save your column set and give it a name. The “Source” column will display the audience source: Google Ads tag or Google Analytics tag (or other sources, if they exist in your account).
Add other columns, too. That way, you’ll avoid confusion when viewing your segments.
I hope you get good results from your RLSA campaigns!

 In the “Linked Accounts” section, click “Details” in the “Google Analytics (GA4) & Firebase” block.
 When the confirmation window appears, make sure you check the box that says “Import Google Analytics audiences after linking (recommended)“, then click “Link“.

 It is always convenient to visit this section from time to time, just to make sure there are no problems with the audience(s) created by the Google Ads tag and also with the audiences that come from other tags, such as Google Analytics GA4, if there are any.

 If you choose the second option “Start with an empty segment”, you will probably have to wait longer until your audience reaches the minimum number of 1,000 (one thousand) visitors in the last 30 days to be used in campaigns.

 One of the columns that does not appear by default is the “Source” column, which tells us the source of the target audience: whether it comes from the Google Ads tag or the Google Analytics tag. To add it, click on “Columns” (1) in the upper right corner, then choose “Modify columns” (2).