In this tutorial, you are going to learn how to import (upload) your CSV file in Google Ads Editor correctly.
If you haven’t downloaded and installed Google Ads Editor yet, just click the button below. It is a free application developed by Google that allows you to work offline and make changes to your account easily.
Let’s review a few basic steps to prepare the file before you import it.
Prepare your CSV file (for manually created files)
Note: if your CSV file was exported from Google Ads Editor, the steps below might be unnecessary.
Before you import it, your CSV file has to be formatted appropriately. To make sure the import is going to run smoothly, follow the steps below.
-
Each row in your CSV file needs to refer to a single entity (e.g. a campaign, a keyword, an ad, etc.), which means every item will have its own row
In the example below, the first line is the header row, the next two lines are keywords, and the last two lines are ad headlines.
Campaign, Ad Group, Keyword, Headline, …
Campaign 1, Ad group 1, keyword 1
Campaign 1, Ad group 1, keyword 2
Campaign 1, Ad group 1, [blank], headline 1, …
Campaign 1, Ad group 1, [blank], headline 2, ……Tip
In case you need to make only minor edits or additions to your account, an easy way to do it is to export a CSV file from Google Ads Editor, make your changes, then just import it back into Google Ads Editor (either into the same account or into a different one).
-
There must be a column header row
During a CSV file import, Google Ads Editor interprets the first row as a column header row. Therefore, you need to select one of the options below to use as your CSV column header row:
→ Option 1: use standard Google Ads Editor column headers. Click here to see a list of available CSV columns.
→ Option 2: leave the first row blank or use your own column headers. You’ll be able to select or change the column headers during the CSV import.
-
Review formatting within each column
Some columns require certain formatting. Language codes are an example: if one cell in a column has more than one value, you’ll have to separate the values with semicolons, such as en;fr for English and French language targeting.
-
Format and encoding: make sure you save your file as a CSV
If you are using Excel to create your CSV file, you should save it with Unicode Text encoding.
→ Windows users: choose Save as > Save as type > Unicode Text.
→ Mac users: choose Save as > Format > UTF-16 Unicode Text. The file extension might change from .csv to .txt, but don’t worry: Google Ads Editor will still be able to import your file without problems.
Import your CSV file
After you’ve prepared your CSV file, follow the steps below to import it into Google Ads Editor:
-
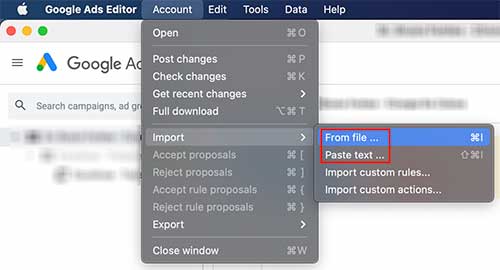
In the menu bar, go to “Account”, then choose “Import”
If you have other pending proposed changes, the menu item will be dimmed. After you accept or reject the other proposals, you will be able to continue.
-
Select “From file…” to select a file or select “Paste text” to copy and paste the CSV data

-
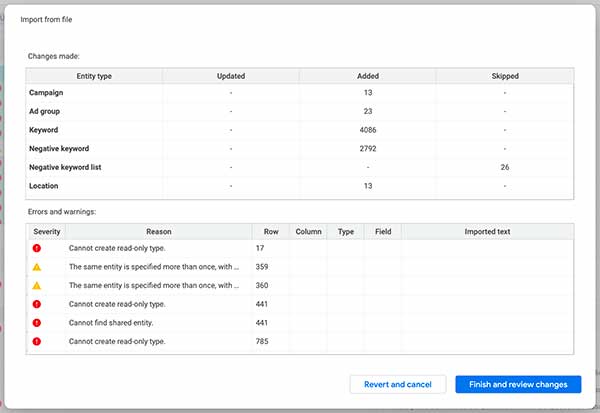
Review the “Import from file” preview window
Make sure the data shown in the “Changes made” section looks correct. As for the “Errors and warnings” table, you will most likely get many messages. That is because many entities and settings in the CSV might not exist in the account you’re importing it into.
Common errors and warnings
“Cannot create read-only type.”
“The same entity is specified more than once, with conflicting settings. Only the first occurrence has been applied.”
“Cannot find shared entity.”
It is usually ok to continue because you will be able to review all the new campaigns and new data from the CSV later anyway.

-
Click “Finish and review changes”
If you don’t want to go on, just choose “Revert and cancel” and nothing will be imported.
-
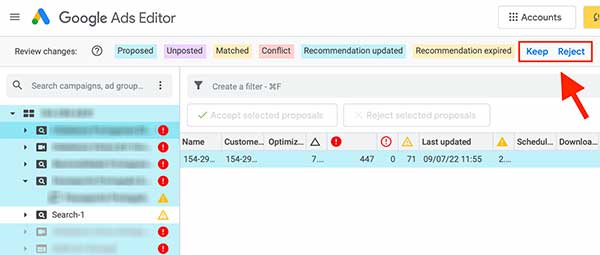
The changes imported from your CSV file will be highlighted in different colors and shown as proposed changes in your account
To accept all proposed changes, click “Keep”.
To reject all proposed changes, click “Reject”.
Conflicting proposals
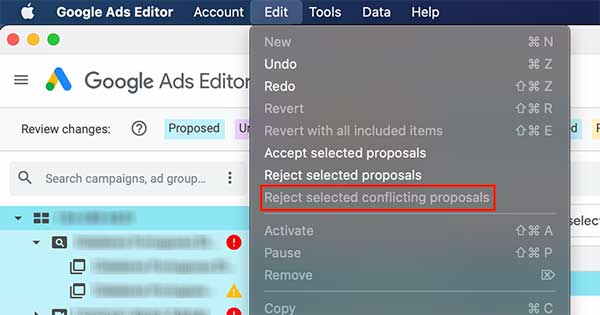
In case you get conflicting proposals, you will be able to accept or reject individual changes. Just select the row that contains the edit you want to reject, then go to the menu bar and choose “Edit” and click “Reject selected conflicting proposals”.
If it is greyed out (as in the screenshot below) it is because there are no conflicting proposals.

Accept the proposed change, thus reverting your conflicting unpublished change. For example, if you found the proposed ad text to be more relevant than your new (imported) ad text, revert your changes to accept the proposed change.
To do that, click the row where the edit you want to revert is, then choose “Reject selected proposals” in the toolbar right above the main table. This will only affect your unpublished changes.
Tip
Are you editing your ads?
You can use a CSV file to make changes to your ads without having to delete them and recreate new ones. This is essential for ads that support version history because it allows you to make edits to your ads while keeping their precious historical data.
To do that, select the column you want to edit and rename it with the tag “#Original“.
As an example, let’s say you need to make changes to the description in one of your ads. You should mark the column “Description#Original”, then add a new column without the “#Original” tag – just “Description” – and make all your edits.
Once you’re done, just import your CSV into Google Ads Editor and apply the changes. This “magical” import will allow you to apply your edits, but without creating new ads and deleting their historical data (which is what happens when you edit them the normal way).
