In this tutorial, you’re going to learn how to use the Keyword Planner, which is a native free tool in Google Ads that helps you find keywords for all your search campaigns.
All of you (advertisers) should use the Keyword Planner to discover new keywords related to the products and services you offer and to get estimates of their search volume, as well as the cost to target them.
You can also create search campaigns from the Planner based on your keyword research.
Advantages of using the Keyword Planner
Find new keywords you can’t think of
Get lists of keywords that are used by people who are looking for your product or service.
See monthly searches
Get accurate estimates on the number of monthly searches each keyword has.
Calculate the average cost
See the average cost for your ad to show on searches for a keyword.
Group your keywords
See how your keywords can be divided into different categories and subcategories.
Important
To use Keyword Planner:
- Your Google Ads account must be in Expert Mode. You won’t be able to use Keyword Planner if your account is in Smart Mode.
- You have to enter your billing information (to finish the account setup) and create a campaign. If you can’t or don’t need to run campaigns and spend money, just pause your campaign and you will still be able to use the Keyword Planner.
Where to find the Keyword Planner
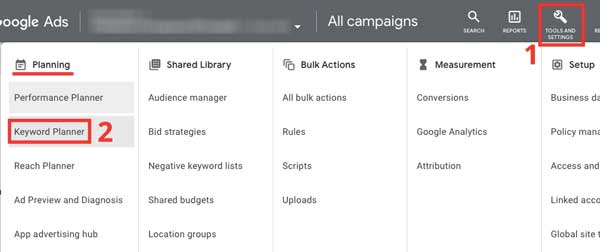
Sign in to your Google Ads account. From the top menu, go to “Tools & Settings” (1). Then, under “Planning”, click “Keyword Planner” (2).
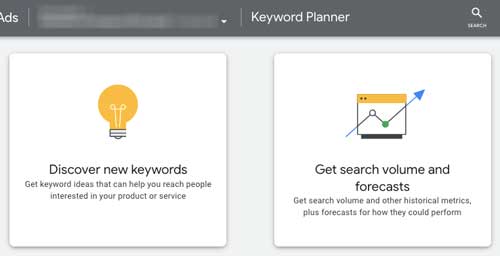
Once it opens, you’ll have to choose one of the 2 ways below to create your keyword plan:
- Click “Discover new keywords” to find new keywords.
- Click “Get search volume and forecasts” to upload your existing keywords.
Discover new keywords
Get suggestions for new, relevant keywords
Insert words or websites related to your product to get keyword ideas.
-
- Go to Keyword Planner and choose “Discover new keywords” (as described in the screenshots above).
You’ll have 2 options to start your plan:- Start with keywords
Insert words that you think people who are looking for your products or services would use. Separate multiple phrases with a comma and space.
Enter your domain and Google will try to exclude keywords not related to what you offer. - Start with a website
Enter a website address and Google will find keywords related to the content on that site.
- Start with keywords
- Click “Get results“.
- Go to Keyword Planner and choose “Discover new keywords” (as described in the screenshots above).
Keep in mind: if you get an error message and prompt asking you to enter new keywords or new website addresses, it means the keywords you entered either have a very low search volume or are considered sensitive. These keywords are not discoverable or forecastable.
Refine your keyword ideas
Use filters and categories to edit your list of keyword ideas.
Filters
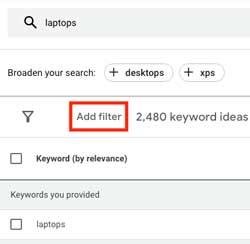
Your keyword ideas can be filtered by:
- Keyword text
- Average monthly searches
- Ad impression share
- Top of page bid (low range)
- Top of page bid (high range)
- Competition
- Organic impression share
- Organic average position
- Exclude keywords in my account
- Exclude keywords in my plan
You can also filter your list using categories that are more closely related to the keyword ideas you need.
For example, if your keywords are related to laptops, you may see categories for laptop manufacturers.
By default, all categories are selected. To filter your keyword ideas, uncheck the boxes next to the categories that you need to remove.
Refine your list by location
Let’s say you need to show ads for your new online software to customers in Brazil who speak Portuguese. Change the settings in the “Targeting” panel (above the graph) to see keyword ideas and historical statistics for such a campaign.
- Location settings: choose a geographical location, including countries, territories, regions, states, and cities. Select “Nearby” to get ideas for places that are near the location you have chosen. If you want to show ads all over the world, just remove all the locations you selected before.
- Language settings: choose the languages that you want to get ideas for.
- Network settings: choose “Google” to see keyword ideas for Google Search or choose “Google and search partners” to see keyword ideas for Google Search, Maps, and Google search partner sites.
Choose your date range
If your product or service is seasonal by nature or if you’re running a seasonal campaign, then your marketing efforts have to be in sync with your calendar. The date range feature allows you to adjust the date range so you can see search volume trends over specific time periods, and get keyword ideas for the right season.
Add keywords to your plan and get a performance forecast
After you get to your final list of selected keywords, there are 2 ways to add them to your campaigns:
- Add the keywords to your keyword plan to get an estimate of their metrics and create a new campaign right from there (method #1).
- Add keywords directly to ad groups within your existing campaigns (method #2).
Method #1
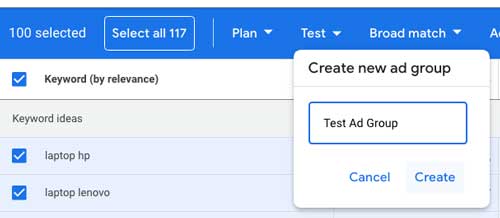
Select the keywords you want to add to your plan (by checking the box next to each one), then create a new ad group with a name. This new ad group will only exist in Keyword Planner, on the “Forecast” page (on the left menu), which is where you will go later.
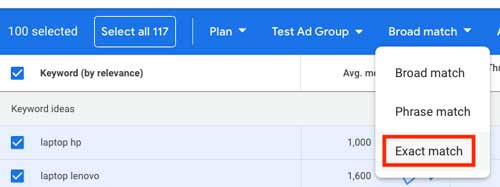
 Using the “Broad match” dropdown, select “Exact match” as the match type (this is my advice, I strongly recommend it).
Choose “Add keywords” and all keywords you selected will be added to the new ad group (which only exists in Keyword Planner). In this example, I named it “Test Ad Group”.

Method #2
Select the keywords you want to add (by checking the box next to each one). Then, choose “Existing campaigns” in the “Plan” dropdown menu and follow the steps.

Get search volume and forecasts
Add your own keywords to a plan and get a performance forecast
Go to Keyword Planner (as explained at the beginning of this article) and choose “Get search volume and forecasts“.
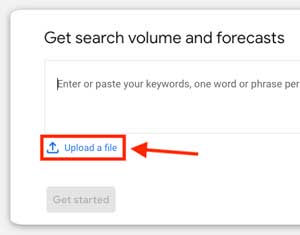
Insert or paste a list of keywords into the search box, or upload a list from a CSV file following the steps below:
-
- Select “Upload a file“.

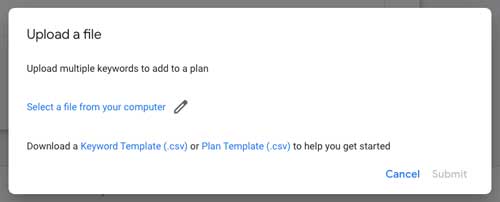
- Choose “Select a file from your computer” (1). Make sure you take a look at the templates for uploading keywords (2). You can download the same templates using the buttons below.

- If you want to upload a list of keywords, make sure your file has just one column with the header titled “Keyword”. You can download the “Keyword Template” below.
- If you want to upload an entire keyword plan, your best choice is to download the “Plan Template” below to include more data, such as campaign, location, and ad group, etc. along with your keywords.
- Click “Submit“.
- Click “Get started“.
- Select “Upload a file“.
About your forecast
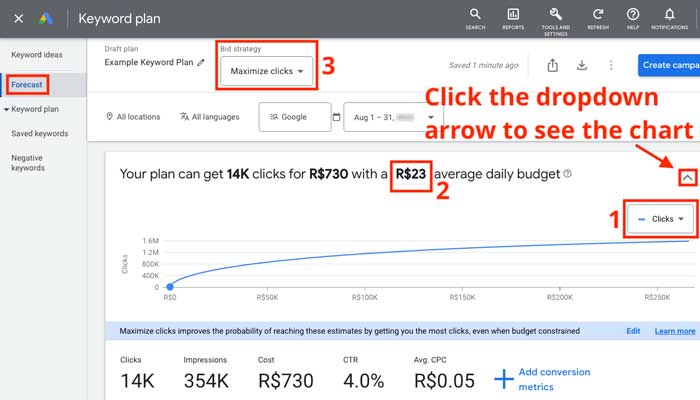
You can see your forecast on the “Forecast” page of your plan (just select “Forecast” from the left menu). All the keywords that you uploaded through “Get search volume and forecasts” and the ones you added from the “Keyword ideas” page will be included in the forecast.
What you can see in your forecast
-
-
-
-
- A performance forecast for all keywords in your plan. Don’t forget to click the dropdown arrow on the right to see the chart.
Things you can do to edit your forecast:- Change the metric forecasted in the chart by clicking the dropdown (1);
- Choose a different average daily budget by clicking the amount (2);
- Select a different bid strategy by clicking the “Maximize clicks” dropdown (3).

- Estimates for each keyword individually.
- In case you implement your plan, the forecast tells you which ad groups your keywords will be added to.
- Date range.
If you want to select a different timeframe for your forecast, click the date range at the top of the page.
- A performance forecast for all keywords in your plan. Don’t forget to click the dropdown arrow on the right to see the chart.
-
-
-
You can also:
- add new keywords by using the “Plus” button or by going back to the “Keyword ideas” page and adding them from there;
- download your forecast (the download button is always at the top of the page);
- share your plan with other people by using the “Share” button at the top of the page.
Create a campaign from your keyword plan
You can implement your plan by creating a new campaign from the “Saved keywords”, “Forecast” or “Negative keywords” pages.
-
-
-
-
- Just click the “Create campaign” button at the top right-hand corner.

- Name your campaign.
- Enter a budget.
- Click “Save”.
- Just click the “Create campaign” button at the top right-hand corner.
-
-
-
Your forecast plan will be converted into a new campaign. You will still be able to access your forecast after the campaign has been created.
