One of the most important things any website owner needs to know is whether visitors click certain links or not.
Knowing how many clicks your top menu (or any other menu) is getting can be crucial to making the best decision.
In this tutorial you are going to learn:
- how to track every click on your menu items using Google Tag Manager;
- how to send this click data as events to Google Analytics 4 (GA4);
- where you can see these click events in Google Analytics 4 (GA4).
Trust me: it isn’t difficult. Let’s see how.
How to track menu clicks using Google Tag Manager and send those events to Google Analytics 4
Follow the step-by-step below.
Step #1: create a Trigger
-
-
Open Google Tag Manager and go to Workspace. From the left menu, choose “Triggers”.
-
Click “New” to add a new trigger.

-
Name your trigger “Click Top Menu [Menu Item]”. For example, “Click Top Menu Home” for the Home link, “Click Top Menu Contact” for the Contact page link, and so on (or choose any other name you like). For the purpose of this tutorial, I’ll be using the Home link on the top menu.

-
Click the “Trigger Configuration” box. Under “Click” choose “Just Links”.
-
Under “This trigger fires on”, choose “Some Link Clicks”.
-
Under “Fire this trigger when an Event occurs and all of these conditions are true”, click the first dropdown (where “Page Hostname” will probably be pre-selected), and select “Choose Built-In Variable”.
-
Choose “Click Element”.
-
Click the second dropdown and select “matches CSS selector”.
If you get the “Invalid filter specified” message, don’t worry: that’s because we still need to enter some info in the third field.
-
Now open your website’s front end (the “shopwindow” visible to people). Choose the menu item you want to track (in this example I’ll be using the “Home” link) and right-click it. Then select “Inspect” (I’m on Google Chrome, choose the equivalent on your browser).
-
Find the specific CSS class of the menu element. In this example, it is “page-item-2” (the other menu items have a different number). Copy its CSS class.
-
Paste the element’s CSS class name in the field that comes right after the “matches CSS selector” field, preceded by a dot (.). So in this case, it should be “.page-item-2”. Because this is a link, you will also need to add “a” after the class name (“a” means “link” in HTML), so it should be “.page-item-2 a” (there is a space between “.page-item-2” and “a”).
-
Click “Save” at the top right-hand corner to save your trigger.
-
Now we need to create a new tag (which is going to use the trigger we’ve just created above). On the left menu, click “Tags” then click “New”.
-
Name your tag “Click Top Menu Home”.
-
Click the “Tag Configuration” section. In the “Choose tag type” tab that opens, select “Google Analytics: GA4 Event”.
-
From the “Configuration Tag” dropdown, choose “GA4 Base Tag” (the full name “Google Analytics GA4 Base Tag” might also appear, it is the same). In the “Event Name” field, write the name of the event (this is how it is going to show in Google Analytics, so choose it carefully). In this example, it is “Click Top Menu Home”.
-
Now click the “Triggering” section. In the “Choose a trigger” tab that opens, choose the trigger you created in the steps before (it should now be in the triggers list).
-
Click “Save” at the top right-hand corner to save your tag.
-
Now it’s time to test the tag. Click “Preview” at the right-hand top corner. A new tab will open with a section that says “Connect Tag Assistant to your site – Tag Manager Preview Mode”.
-
Copy your website’s URL including the “https://” and hit “Connect”. Tag Manager will now connect to your website and open it on a new tab.
Tip
I recommend separating the tabs in different windows and placing them side by side on your screen. This will allow you to immediately see whether the tag you created will be fired when you click the menu item to test it.
-
The Tag Manager Preview tab should display the new tag (which in this example is “Click Top Menu Home”) under “Tags Not Fired”.
-
Go to the website window and click the menu item you created the tag for (in this example it is “Home”) and see if the new tag is fired (it should now be under “Tags Fired”).
Keep in mind
Depending on the way your website is coded, the CSS class may not work. In this case, you can try the CSS ID instead. There are also many other ways of tracking link clicks with Tag Manager.
-
If the tag was fired it means you are all set. Now it’s time to publish your new tag. Go back to your Tag Manager workspace and click the “Submit” button at the top right-hand corner.
-
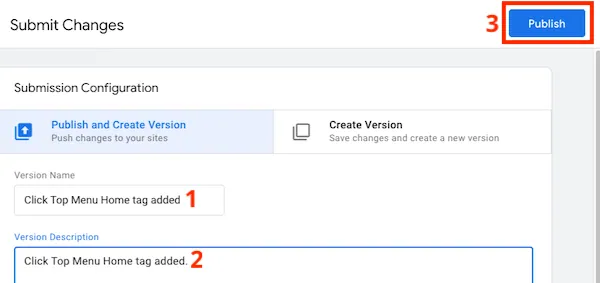
Every time you submit a new tag (or any change you’ve made to tags, triggers, or variables) you’ll need to name that submission version. Add a nice description so you can have control over your Tag Manager history in case you need it in the future. Then click the “Publish” button.
-
From now on every click on “Home” on the top menu will be sent as an event to GA4. Make sure you do the same for all other menu items (and also for any other link clicks you want to track on your website).
-


Where you can see these link click events in Google Analytics 4 (GA4)
To see all these menu click events in GA4 you have 2 options.
Option 1: the Realtime report
Choose Reports from the menu on the left, then choose Realtime. Scroll down until you see the “Event count by Event name” box, your custom events should be there.
Option 2: the Events report
Choose Reports (1) from the menu on the left, select Engagement (2), then click Events (3).


You will see the “Event count by Event name over time” box. Your link click events should be there.

That’s it. Make sure you check your reports from time to time to understand how visitors behave when they visit your website!